In-App Provisioning
This document provides an overview of how to implement in-app provisioning:
Overview
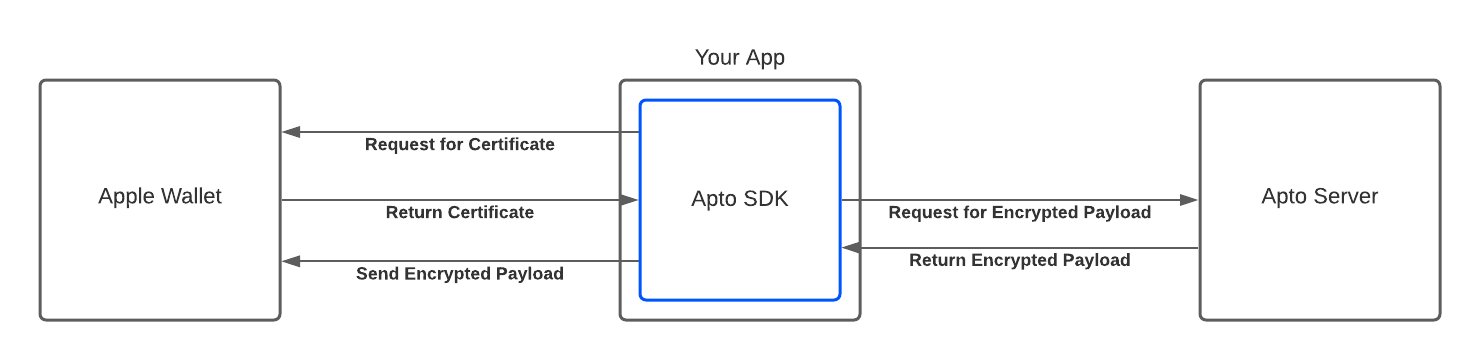
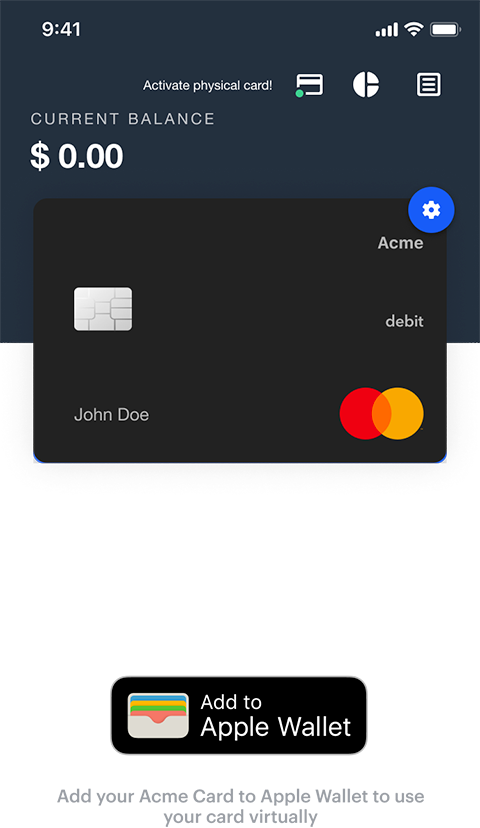
In-app provisioning allows your cardholders to add their cards to their Apple Pay wallets without having to type in their card number. Cardholders can click an ‘Add to Apple Wallet’ button and have the information securely passed.
Through our SDKs, your app will initiate the process to provision your card to a digital wallet the moment the cardholder clicks our Add button. A request from your app is made to receive an Apple Public Certificate, nonce, and nonceSignature. The app will act as a conduit to pass information to and from the digital wallet provider to Apto backend servers. Apto will use our private keys along with certificates provided by Visa/Mastercard to encrypt the cardholder’s card data and pass back an encrypted payload to your app. The encrypted payload can only be decrypted by Visa/Mastercard and does not require any processing from you. The SDK will automatically pass the encrypted payload to the digital wallet provider to begin the provisioning process. At this point, the provisioning process follows the same approvals required as if a cardholder manually entered the card details. An OTP verification will be required.
Requesting Entitlement & Whitelisting
To add in-app provisioning to your iOS app, you must first receive entitlements from Apple. This step is required even if you use the Apto UI SDK or are issuing cards in the Green Program.
To request the entitlement and whitelist for the issuer’s app(s), send the following information to apple-pay-provisioning@apple.com:
Subject: Apple Pay Entitlement & Whitelisting Request - Patriot Bank - US
Body:
- Issuer Name: Patriot Bank
- Country [Country Code]: US
- Team ID: [Your Team ID found at https://developer.apple.com/account/#/membership]
- Adam ID: [Your Adam ID (your app’s unique numeric ID), found in App Store Connect or in the App Store link to your app]
- App Name: [Your App Name]
Once your entitlement has been approved, you will need to configure your entitlement. Follow these steps:
- Go to https://developer.apple.com/account.
- Select Certificates, Identifiers & Profiles.
- Locate the Provisioning Profiles section to the left.
- Select Development or Distribution (depending on what you wish to accomplish).
- Select the provisioning profile that you will use to develop or distribute your app to the App store.
- Select edit and go to the entitlements dropdown.
- Select ApplePay In-App Provisioning Development.
- Select Generate
- Go to Xcode and go to Preferences>Accounts>Your account>View
- You can now download the profile generated.
- Go to the Build Settings tab.
- Locate each of the Provisioning Profile and select the generated profile.
- Add the entitlement manually to your .entitlement plist file in your Xcode project by setting TRUE to com.apple.developer.payment-pass-provisioning.
Notify Apto Payments
The following information needs to be sent to Apto Payments so it can be added to your digital wallet configuration:
- Associated Application Identifiers
- Associated Store Identifiers (Adam ID)
- Application Launch URL
To notify Apto Payments of these details please email Customer Support, customersupport@aptopayments.com.
Install the SDK
Now you are ready to use our SDKs to add in-app provisioning to your app. Our SDKs can help streamline the calls from the Apple classes so that you don’t have to spend time understanding how to use them.
Please refer to the links to get our latest iOS SDK.
Make sure you have the following versions or above:
- AptoSDK 3.5.0
- AptoUISDK 2.13.0
Start In-App Provisioning Process
Check if your device is eligible
Before you allow in-app provisioning, you must check to see if your device is eligible for this function by calling Apple’s PKAddPaymentPassViewController.canAddPaymentPass().
You can also use a helper class provided by our SDK:
shouldShowAppleWalletButton(iapEnabled:), returns true if the device and the card are eligible to use the in-app provisioning verification. Please note that also the card has to be eligible. To check if a card is eligible you have to provide the value of the card feature property inAppProvisioning.
Add the Add to Apple Wallet button
Before you show the button, please follow the above instruction to determine whether the button should be shown. To show the button, use PKAddPassButton. When the user taps the button, create and present a PKAddPaymentPassViewController, which contains Apple’s UI for the push provisioning flow.
You can also use a helper class provided by our SDK which has the following convenience method:
appleWalletButton(), returns thePKAddPassButtonrepresenting the UI required to start the process.
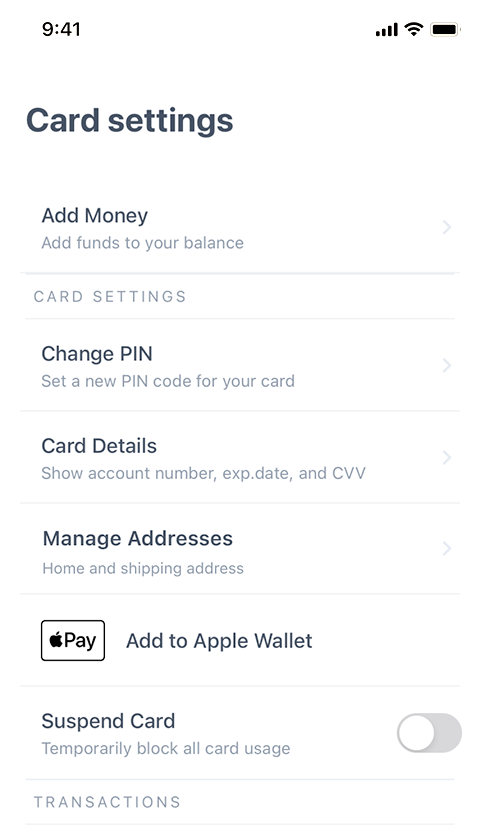
In our UI SDK, there are two entry points for this button to appear:
- From the Main Card screen when a user logs in for the first time and does not have any transactions, the Add to Apple Wallet button will appear below the card.
- From the Card Settings screen, an Add to Apple Wallet row will appear.
Testing
The com.apple.developer.payment-pass-provisioning entitlement only works with distribution provisioning profiles, meaning even after you obtain it, the only way to test the end-to-end in app provisioning flow is by distributing your app with TestFlight or the App Store.
Contributions & Development
We look forward to receiving your feedback, including new feature requests, bug fixes, and documentation improvements.
If you would like to help:
- Refer to the issues section of the repository first, to ensure your feature or bug doesn't already exist (the request may be ongoing, or a newly-finished task).
- If your request is not in the issues section, please feel free to create one. We'll get back to you as soon as possible.
If you want to help improve the SDK by adding a new feature or bug fix, we'd be happy to receive pull requests!